Understanding the different file storage options within Microsoft 365

Understanding the different file storage options within Microsoft 365

Within Microsoft 365 there are many file storage options, including SharePoint, OneDrive, and Microsoft Teams. In this episode of the Adopt 365 podcast, your hosts Barry, Anthony and Megan discuss the file storage options within Microsoft 365.

Read More

Automating reporting and managing attendees with Microsoft Teams Webinars

The fact that Microsoft Teams now allows us to quickly and easily create webinars is fantastic. With a few clicks, you can create your webinar, add speakers and customise a registration page to share with potential attendees.

One area I have had a few challenges with is further automation and sharing the registration with a wider group of people, for example, a marketing team that are all working on the event together.

By default, only the organiser is able to see the attendee report if enabled and for me, this created a few challenges.

If you are using Microsoft Dynamics as your CRM there are some fantastic integrations that would allow you to build more effective workflows quickly and easily but if you aren’t, out of the box you are left with little option.

That was until I did a little bit of digging into how the registrations work for Teams Webinars, following the article below I learnt that registrations and attendees are in fact managed my a Microsoft List stored under the organiser’s personal lists.

https://support.microsoft.com/en-us/office/schedule-a-webinar-0719a9bd-07a0-47fd-8415-6c576860f36a

With a little bit of help from the fabulous Christopher Hoard I was able to find the lists relating to the webinar I had created.

To do this you will need to visit Microsoft Lists from the Office waffle, once in Lists select the My Lists option (2) from the recent lists (1) drop-down.

From here amongst any other lists, you may have created you will see lists name Event (3), Questionnaire (4) and Presenter followed by a unique ID. These lists relate to your Microsoft Teams Webinars, the Event list contains the metadata for the event such as the date, registration link etc, etc, the Questionnaire list contains the registration information and the presenter list does what it says on the tin and contains the information about the presenters for the event.

SNAG-2621.png

To find which of these relates to the webinar that you wish to view/edit or create an automation workflow for I would recommend looking at the event lists firsts to review which is the one that is relevant to your webinar in question.

Inside the event list, you can easily see the title of the webinar (4), once you have this you can easily figure out the name of the relevant attendee’s (Questionnaire) list by looking at the unique ID after the event.

SNAG-2624.png

When inside the attendee’s list you can see all the relevant information about the attendees, from here I have been able to edit attendee information as well as delete attendees without issue, but please go careful as I am unsure of how supported this is.

Now I knew which list the attendee information was stored in I was able to create my relevant automation using Power Automate.

The only thing to keep in mind is that when in Power Automate it will not find these lists automatically, I had to paste the address of the list into the trigger for it to be found.

I have now got several fully automated workflows when an attendee registers for my Teams Webinar. Fingers crossed in the future this could be a bit more user friendly, maybe even add a create automation with PowerAutomate button at the top of the webinar!

SNAG-2627.png

Adopt 365 Podcast - Episode 6 - How to make the most out of Microsoft Teams Meetings

Adopt 365 Podcast - Episode 6 - How to make the most out of Microsoft Teams Meetings

With lots of new features coming to meetings in Microsoft Teams and with some users now heading back into the office we thought we would use this episode of the adopt 365 podcast to talk all about meetings, best practices, new features , webinars and more.

Read More

Viva Connections Teams App Failing to Upload: Fixed

I recently had to troubleshot an issue where a Viva Connections Teams App created using the Microsoft Process document here Install Viva Connections today - Microsoft Tech Community failed to upload to Teams.

Upon uploading the package we received the following error.

SNAG-1769.png

Unfortunately the error “We can’t upload the app. Please try again. If you continue to have problems, contact Microsoft customer support” was less than helpful in troubleshooting.

In the end, I decided to compare a working package in another tenant to the one that was failing. Within the zip file created is a manifest JSON file that lists all the information for the package. Within the manifest file, I discovered one of the URL’s within the file, in particular, the website URL had been added without the https element of the address.

After updating the manifest file, adding it back to the ZIP and reuploading the app, it uploaded fine and I was able to deploy Viva Connection to the relevant users.

Viva Connections

Is your organisation ready for hybrid working?

Is your organisation ready for hybrid working?

As we here in the UK head into the spring, people are starting to receive the coronavirus vaccine on mass, and there is a hope of the lockdown restrictions that we have lived through for most of last year coming to an end. With all of this taking place, this will mean people and organisations have to consider what the future of work looks like for them.

Read More

Adopt 365 Podcast - Episode 4 - Our thoughts from Microsoft Ignite

Adopt 365 Podcast - Episode 4 - Our thoughts from Microsoft Ignite

On today's podcast we will discuss our thoughts following Ignite and particularly the latest announcements and features coming to Microsoft Teams.

Read More

Now Available! Add a whiteboard as a tab in a Microsoft Teams channel

Sometimes its a simple change that can make a big difference and this might be the case for the latest update from Whiteboard and Microsoft Teams.

Microsoft Whiteboard has been available in meetings or via the standalone applications for some time and whilst there have been people offering hacks to get a whiteboard appearing as a tab in a channel, there has been no official way to achieve this, until now!

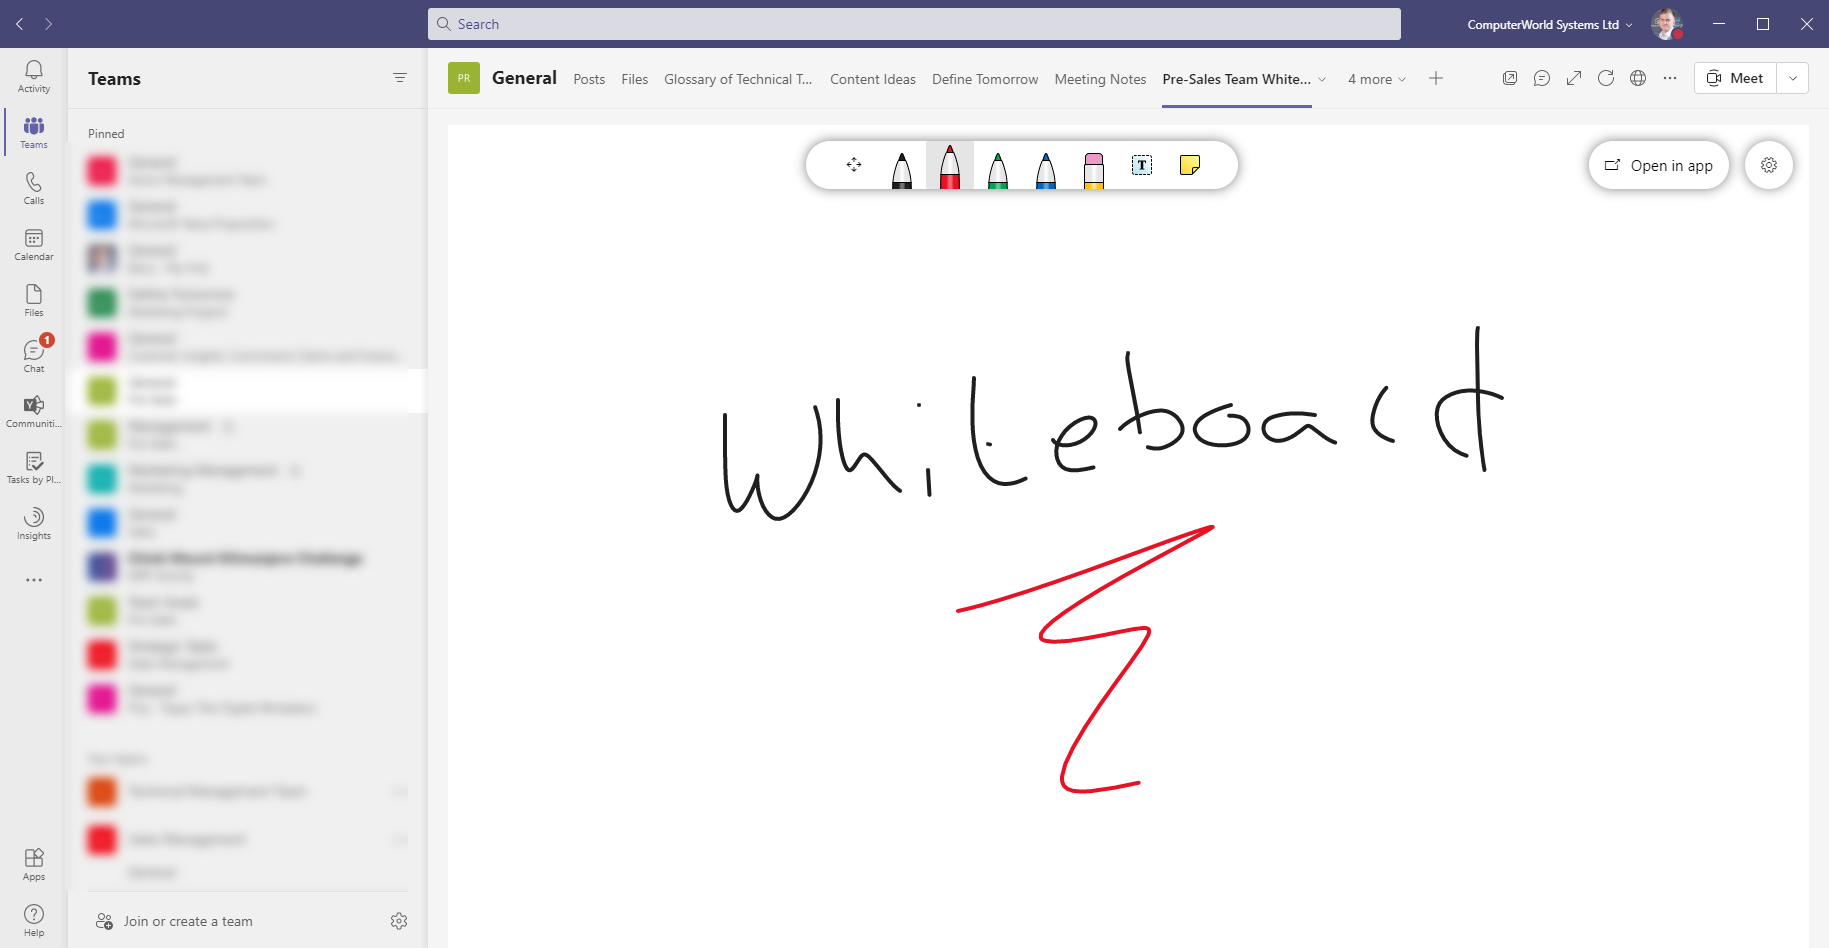
With the latest updates to Teams, you are now able to select Whiteboard as an option for the available tabs when adding a tab to a Teams channel.

When you choose to add a tab simply search for whiteboard as below

Adding a whiteboard as a tab in a Teams Channel

You will then get the option to name your whiteboard as below. As ever with Microsoft 365 ensure you give it a full name the will explain the purpose for the board even if visiting it from outside of the channel.

As you can see below you will now have a persistent whiteboard within your Team. This could be useful for visual references and discussions as a Team that will persist between meetings and discussions.

Whiteboard within a Teams Channel

Adopt 365 Podcast - Episode 2 - Driving Successful Adoption of Microsoft 365

Adopt 365 Podcast - Episode 2 - Driving Successful Adoption of Microsoft 365

In this podcast we discuss our Top 6 Tips to successfully drive adoption of Microsoft 365 in your business.

Read More

Where are my documents saved within Microsoft Teams?

Why are my files in OneDrive and SharePoint?

There is a common confusion amongst users of Microsoft Teams as to what is happening when files are shared and saved within Microsoft Teams. In this blog post, I will review a number of scenarios working with Files in conjunction with Microsoft Teams to illustrate where files are stored.

Hopefully, by the end of this blog post, you will have a better understanding of how Microsoft Teams works in conjunction with OneDrive and SharePoint.

The first important thing to understand is no documents are stored within Microsoft Teams itself, Microsoft Teams utilises repositories that are already available within the Microsoft 365 suite of tools for document storage.

At a high-level files sent via Chat are stored in OneDrive and those within Teams Channels are stored in SharePoint, but we will dig into this more with the examples below.

Chat in Microsoft Teams - OneDrive

When you are chatting with an individual or a group of people in Microsoft Teams you may share a document with these individuals. This is easily achieved by selecting the attachment icon (1) and then selecting upload from my computer (2) before selecting the file and sending as part of the chat message.

Sending a file within a Microsoft Teams Chat

When you share a document via this manner the file is uploaded to your OneDrive account into a folder called Microsoft Teams Chat Files (4), when I browse to this location you can see the document (5) I uploaded in the earlier step. When you view the sharing permissions for this file you can see that Megan has been given the appropriate permission to this document (6)

SNAG-0666.png

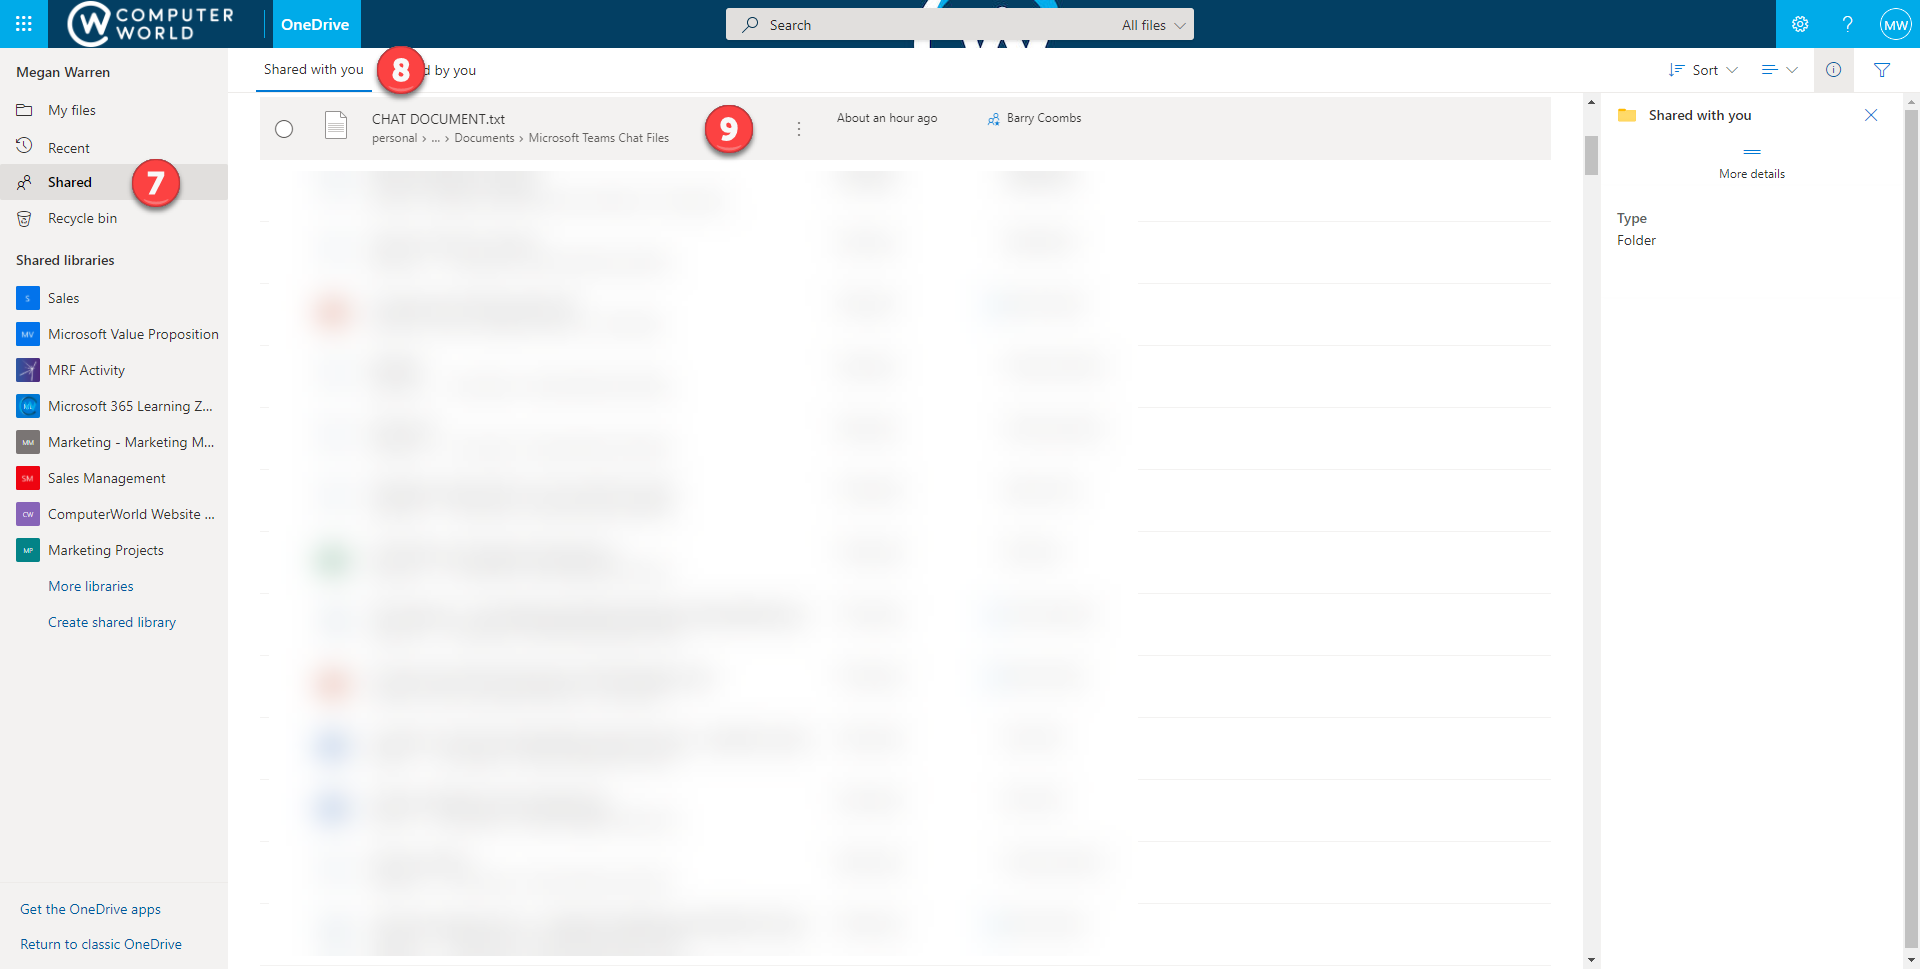
If a document has been shared with you via chat you are able to see these documents in the Shared section (7) of OneDrive under Shared With Me (8), below you can see the file (9) I shared with Megan from within her OneDrive account.

MicrosoftTeams-image (2).png

Files within a Microsoft Team Channel - SharePoint

For every Team and Private Channel that is created a dedicated SharePoint site is created, one of the reasons for this is to allow the files associated with the Channels to be stored within this SharePoint site.

In the first scenario, we will upload a file to a Teams Channel conversation (10)

Uploading a file to a Teams Channel Conversation

If we select the files tab (11) within the channel, we can see the document we uploaded above (10) is now visible (12) in the root folder of the channel files.

In the image below we have also uploaded another file to this team (13) which is now also visible in the files tab (14). If we click Open in SharePoint (15) we will see where these are actually stored within SharePoint itself.

Files in Microsoft Teams

As you can see below after we clicked the Open in SharePoint button within Teams (15) we were taken to the appropriate SharePoint site that has been created for the Team or the Private Channel. We can see the SharePoint site is called the same as the team (16) and the location that we are taken to (17) will match the name of the channel. Inside this location we are able to see the document that we uploaded to the Channel Conversation (18) and from directly within Files itself (19).

Teams files within the SharePoint Site

You can easily search for the files that are stored within your Teams channels by using the search bar at the top of teams (20) this will show files from across all of your Teams channels as below.

SNAG-0672.png

Conclusion

Microsoft Teams works in conjunction with a number of other applications and tools that are available commonly within Microsoft 365. In the examples above we looked at a number of scenarios surrounding the use of files in Microsoft Teams, we were able to review how Teams stored these files behind the scenes in both OneDrive and SharePoint. Fully understanding where these files are stored will help you work more effectively within Teams but also enable you to quickly and easily find your files when you should need them.

How to quickly and easily save to a Microsoft Team directly from an Office Application (Word, Excel, PowerPoint etc)

In this blog post, I will cover a top tip to make it easier to save and access documents stored within Teams (SharePoint) when working with Office Applications.

I am a regular user of Microsoft Office applications specifically Word, Excel and PowerPoint. Whilst I am using these applications I will either be saving my documents to my personal OneDrive whilst they are a work in progress or to Microsoft Teams (SharePoint) when I am collaborating with Team members or at the point it is ready to be shared with the wider audience.

Read More

Microsoft Viva Topics - My experience with Microsoft Viva Topics after two weeks (Part Three)

Now that Microsoft Viva Topics has been running for two weeks, I am getting many more suggested topics. After a week, I had received 3 or 4 suggested topics. I now have had probably over 100 topics that have been suggested to me. When a topic is suggested, you can choose whether you wish to confirm or remove the suggestion within the suggested topic section in Topic Center.

Read More

New Poly Lens Desktop App featuring Health and Well-Being features

The new Poly Lens app is now available for download. The Poly Lens app is designed to give users a single place to control and customise their Poly products and works in combination with Poly Lens Cloud that gives IT the ability to centrally manage and support all deployed devices.

You can download the Poly Lens App yourself at the link below

Poly Lens App - Make it your own | Poly, formerly Plantronics & Polycom

It is important to note that initially this application only supports the Poly Studio P Series of products however upon installing it did pick up my Poly Studio and allows me to see the firmware status and configure the user-facing subset of the settings available.

Poly Studio configuration with the Poly Lens Desktop App

The Poly Lens app allows you to control all the controls for your device, for example with the Poly Studio I can configure the tracking mode, camera movement, zoom etc as well as configure the audio-related settings. It also allows you to gain access to support when needed whether that is the relevant resources on Poly support site such as user guides or to collect and download logs or to contact support.

More than just device settings

The Poly Lens app, however, offers more than just the ability to configure and support your Poly device, it also has a number of other features to allow you to get the most out of the device as well as to help look after your health and wellness.

SNAG-0571.png

Health and Wellness

Within the application itself, users are able to configure features that may be helpful to them,

Soundscaping

The first tab is soundscaping, this allows you to configure a set of background sounds to help minimise distractions, reduce stress and improve focus. I often use these type of sounds when focusing on the Calm application on my phone, however, to have it built into an application already running on my machine is really good. (Having a key shortcut to turn this on or off in the future would be amazing Poly!)

Hydration

Next up is the ability to be able to configure hydration reminders, within this tab you can configure how often you want to be reminded and between what hours. Maybe we will see Poly introduce a line of personal well-being connected tech for the workplace? A connected water bottle that links with Poly Lens would be interesting.

Hydration reminders in the Poly Lens App

Vision

The final area is vision, this is the ability to configure reminders to look away from the screen and indeed to get up and move.

Break reminders in the Poly Lens apps

Conclusion

It is great to see Poly start to bring together multiple applications that are used to manage the various Plantronics, Polycom and Poly devices. From a perspective of management, it allows the users to quickly and easily manage the settings that matter to them. It will be good to see more devices become supported in the future.

For me the really interesting point about this application is the inclusion of health and wellness, undoubtedly the features included in the initial release are nicer to have features than groundbreaking however it is really interesting to think where this could go with investment in the future.

I have configured all of the above features and I’m already loving the soundscapes! I will update in the future as to how helpful or annoying I have found the relevant reminders.


Protect your organisation against ransomware: Have you implemented these ransomware mitigation steps?

Ransomware Attack

I am increasingly learning of people being affected by ransomware, and often the damage inflicted could have been easily stopped or at least limited by implementing some good practices. In this blog post I will review some of my top tips.

The Weakest Link - User

As we all know, these attacks often start with the user and not uncommonly these types of attack will start with some form of a phishing attack via email.

  1. User education is one of the areas that I recommend businesses invest in when it comes to cybersecurity. Increasingly these attacks aren’t technical in nature at all and start with social engineering and gaining confidence with their victims.

    Solution: One way that I have found particularly successful is simulated phishing attacks with the necessary training to ensure lessons are learnt. At ComputerWorld we have found Barracuda Phishline is particularly effective at this.

  2. As mentioned above, one way we see these attacks being engineered starts with an email being received by the targeted victim. This will then elicit some kind of behaviour that encourages the user to give up their password or download some software.

    Solution: I would recommend looking at the tools you have in place for email cleansing, spam and malware protection. Again at ComputerWorld we recommend the Barracuda Essentials products for protection against email-borne cyber threats. But whatever solution you have in place, ensure you have configured and are using all of the features available to you. More often than not, a solution is in place that could stop an attack but the feature has not been deployed.

  3. As a final line of defence around the user, you want to ensure you have a strong next-generation anti-virus deployed on the user’s machine.

    Solution: AV has come a long way, and you want to ensure that the solution you are using today doesn’t rely on virus signatures and that it has the ability to recognise attack patterns to protect fully against zero-day threats. At ComputerWorld we recommend the BitDefender or Carbon Black solutions depending on your needs.

email threat scan.png

Administrator Permissions

One of the most common ways I see ransomware proliferating a network is by exploiting administrator permissions. There are three specific areas I would like to address here.

  1. Global Administrator Permissions - Unfortunately, the entry point for these types of attack can be by exploiting an account used by someone in the IT department. If a user with a high level of network permissions on the account they use daily gets their account compromised and not only does the attacker have access to their device but potentially to the whole network.

    Solution: No one's user account that they use on a daily basis should have any form of network administration rights. Users who require higher level permissions should have an alternative account with the required privileges that is only used for these specific activities. This will still enable you to connect to undertake the tasks you require but do so from a more secure posture.

  2. Local Admin Permissions - Often a ransomware attack on a local machine is only possible if the user has local admin permissions. Very few users should need to have local admin permissions on their own machine.

    Solution: Ensure users do not have local admin rights to their machine, where they do require local admin rights to consider an approach of elevated rights. There are several ways to achieve this, including using various third-party software solutions like LiquidWare ProfileUnity. But wherever possible, ensure users should not have local admin rights.

  3. Local Admin Account - You will want to consider your approach to local admin accounts when building new devices. If someone is able to infiltrate just one of the PCs on your network and then brute-force a local admin account that you use on all device builds they will be able to deploy their ransomware attack.

    Solution: There will be a number of solutions to this problem, initially ensure that any local admin accounts used during the build process use a highly secure machine-generated password that is safely secured in a password manager for use only by the appropriate people in IT.

Network Protection

If ransomware does take hold within your network, you want to ensure that where ever possible you limit where it may be able to infiltrate to.

  1. Wherever possible, I would recommend segmenting your network to ensure only the relevant protocols and people can pass through boundaries such as subnets configured between VLANs and VPNs.

  2. Consider implementing a zero-trust approach to user-facing networks, effectively ensuring that devices placed upon these networks have no ability to communicate with each other. Where possible, they have limited and secured access to other network resources such as applications servers. Effectively the ideal scenario is your user-facing LANs are effectively just internet connections allowing you to connect securely to the relevant resources the same way as it would if they were working from home.

Data Protection & Recovery

You need to work to the basis that you will at some point be affected by a ransomware attack. As such, it is highly critical to consider how you are going to be able to recover.

  1. Configure SAN Snapshots! - Often business-critical data will be stored in some way on a SAN, whether this is in the form of a virtual machine or stored directly within a volume on the SAN itself. As such, the first point of protection that we should consider is SAN-based snapshots. Most modern SAN devices will allow you to configure regular snapshots of the data with no performance loss and very little increase in the used capacity. Consider what your snapshot schedule should look like and how many iterations of the snapshots you wish to keep. I would recommend taking snapshots at regular intervals (every 30 mins maybe) and ensuring you keep snapshots for a period of up to two to three days where ever possible. This will allow you to recover quickly with minimal data loss even if a ransomware attack goes unnoticed over a weekend.

  2. Protect your backup server - One of the common scenarios we always see is that when a ransomware attack occurs the backup repository is often encrypted itself. Now point 3 below will take this scenario into consideration, but we should do whatever we can to ensure the backup server is protected. First of all ensure that your backup server isn’t named Backup server or Veeam server or similar, protect it via obscurity make it difficult for the attacker to find the server in the first place. Next, ensure that it isn’t accessible to any user-facing networks and anywhere possible as restricted from any other infrastructure servers. IN addiiton to this you should also configure application whitelisting to ensure that only the backup application can run on this server.

  3. Think About Air Gaps - You will want to ensure that as a minimum you keep at least one copy of your data off-site with wherever possible some form of air gap between the production networks, backup server and your off-site copies. This can be achieved by having a copy of your data on a tape, however, the recovery times from tape are less than ideal in the modern world and therefore I would recommend using a solution like Veeam Cloud Connect which allows a copy of your backup to be replicated to a cloud-based provider.

This video illustrates how easy it is to replicate your Veeam data to a Veeam Cloud Connect Provider. This video is based upon an older version of Veeam but the process is much the same in the newer versions.

Visibility and Response

The final element I want to discuss in this blog post is visibility and response, being aware of what is going on within your IT environment and knowing what to do if an attack occurs.

  1. All too often there may have been an infiltration into your network without your realising. An attacker could be in your network now planning how to best undertake their attack.

    Solution - You will want to ensure you have tools available to you that give you visibility of what is going on within your environment. These take many forms, but importantly you want to ensure they are easy for you to use and help you rather than overwhelm you with unnecessary information. A tool such as Netwrix Auditor will give you an insight into what is going on within the servers within your environment, highlighting worrying activity like repeated failed logins and changes happening on desktops and servers. For a more focused threat detection solution, I would recommend looking at Secureworks Taegis™ XDR Previously Red Cloak™ TDR. This platform will allow you to detect threats across your environment as well as giving you the ability to investigate and respond to the threats with the support of SecureWorks specialist teams.

  2. If the worst has happened and users are reporting devices are becoming encrypted across your network you need to know what to do within that moment of panic.

    Solution - Prior to being in the situation above, you will want to ensure you have fully considered and documented how you would respond to such an attack in the form of a cyber response plan. What is right for your organisation will differ depending on your unique requirements, but below are some basic principles that I would take into consideration.

    1. Isolate and take control - You will want to consider how you can isolate the attack as soon as possible. If it is just affecting one user or a couple of users, I would disconnect these devices from the network and consider even shutting down that section of the network. If you believe it could be wider, I would consider disconnecting all external connectivity to the organisation to limit the effect of an attack that is being controlled from an outside source and where ever possible shut down all devices that you believe may have been affected to reduce the effect of possible encryption that may be on-going. The above could have massive implications for your business but so could the effects of an out of control ransomware attack, as such thinking about how you will make these decisions and who will be involved in this process needs to be considered in advance.

    2. Investigate - When you have things under control, and you have isolated the relevant areas, you will want to investigate what has happened and how it happened. Use the tools available to you along with Windows logs to understand where the attack started and how they were able to infiltrate your network. This will hopefully allow you to ensure you close all gaps and further isolate affected systems before even thinking about recovery.

The image above shows a Netwrix alert regarding possible Ransomware activity. Just one of the useful features the product has that could help protect you.

The image above shows a Netwrix alert regarding possible Ransomware activity. Just one of the useful features the product has that could help protect you.

Conclusion

Hopefully, you have found this blog post useful and managed to find at least one or two areas to help you further tighten security or respond to an attack more effectively. We typically find that when an attack has occurred one or more of these areas have either led to the attack happening in the first place or have resulted in the data being lost with no recovery option available. If you would like to discuss your organisation cyber-security posture with a security professional with no cost or obligation, please complete the form below.

View our Privacy Policy


Microsoft Viva Topics - One Week In, Updates and Thoughts

Microsoft Viva Topics - One Week In, Updates and Thoughts

I am now approximately one week in with Microsoft Viva Topics running on two tenants, in this blog post I will discuss what I have learnt in the first week, explore some of the functionality and share some initial thoughts. If you haven’t seen my first blog post on Viva Topics, I recommend checking that post first.

Read More

Adopt365 Podcast - Episode 1 - Well-being & Productivity

Adopt365 Podcast - Episode 1 - Well-being & Productivity

The challenge of managing large workloads while still maintaining a healthy work/life balance is one we are all very familiar with. In this inaugural episode of the Adopt 365 podcast Barry, Megan and Anthony discuss the tools that are built into Microsoft M365 and Teams that help you to improve your efficiency while looking after your well-being.

Read More

First Look at Microsoft Viva Topics - Licensing and Initial Installation

Last week Microsoft announced Microsoft Viva a unified set of tools focused on employee experience, if you would like to read more on this subject please check out my previous blog post. Since then we have seen a first release of Microsoft Viva Insights and now we have GA of Microsoft Viva Topics.

In this blog post, I will run you through my first experiences installing Viva Topics from a trial on my journey to learning more about Microsoft Viva Topics.

Read More

Microsoft Viva Insights Now Available in Microsoft Teams

Microsoft Viva Insights is now appearing for some users within the Microsoft Teams App store. As a reminder, Viva Insights is part of Microsoft’s newly announced Employee Experience platform that will be available directly within Microsoft Teams. In this early release, the Stay Connected and Protect Time tabs are available, leaving the Home, My Team and My Org tabs that have been demonstrated outstanding.

Read More

Define Tomorrow Podcast - Workspace Panel Discussion

In this episode of the Define Tomorrow Podcast recorded for Define Tomorrow 2020., I am joined by four big names from the EUC community.

We discuss everything important to the modern workspace including

  • What does the term workspace actually mean?

  • What workspace trends are we seeing at the moment?

  • Our top tips for workspace architects looking to move their workspace into the modern world

  • What role does Windows play in the workspace of the future?

As well as other topics.

Read More

Microsoft Viva Announced - A unified employee experience platform within Microsoft Teams

Microsoft Viva Announced - A unified employee experience platform within Microsoft Teams

Yesterday Microsoft CEO Satya Nadella announced Microsoft Viva the first employee experience platform to bring tools for employee engagement, learning, wellbeing and knowledge discovery, directly into the flow of people’s work within Microsoft Teams.

Read More

New Microsoft List Rules - How to use rules in Microsoft Lists

Rolling out now is the ability to create quick and easy rules within Microsoft Lists. Whilst it has been technically possible in the past it has relied on you using Power Automate Flows to create such actions.

Read More