

Deploying VMware NSX-V – Part 2 NSX Manager Initial Configuration
/Following from Part 1 the NSX Manger virtual machine should now be running and accessible via the web interface. To begin the configuration login to the NSX Manager Virtual Appliance using the admin account.

Once authenticated you have the option to configure several settings on the appliance. This is a similar interface to the vCenter Server Appliance and allows you to complete tasks such as changing network settings, completing backup and restores of the configuration, and performing upgrades. Click “Manage vCenter Registration” to start the process. I’m going to register this NSX Manager with the vCenter server in site-1.

There are two settings required to register NSX Manger to the vCenter server. The first is registering the NSX Manger with the Lookup service URL. The second is registering the NSX Management Service against the vCenter server. What you put in these boxes will depend on your vCenter configuration. If using an embedded vCenter deployment then enter the address of the vCenter Server. If using a vCenter with External Platform Services Controller then enter the address for the Platform Services Controller.

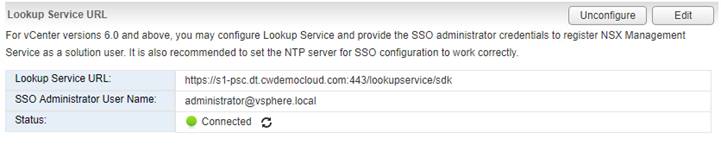
Enter the details for your lookup service host, the configuration wizard is smart enough to add the full url for you. In my lab I’m using the address of my PSC and using the SSO administrator account to register the service. Once happy click OK.

Review and accept the certificate warning.

After a minute or so you should see the status change to connected.
Next is the vCenter registration process. Click edit to configure this setting.

Enter the detail for your vCenter server you wish to pair this NSX Manger with. In my lab I’m using the address of the VCSA in site-1 along with the SSO administrator account. In the real world you would use a dedicated service account with appropriate permissions – all of this can be found in the official documentation.

Review and accept the certificate warning.

Similar to the previous step the status will change to connected after a minute or so. It will also tell you the when the last inventory update was. There is the option to force a manual update by clicking the refresh arrows.

If you are already logged in to the vSphere Web Client then log out and close the browser. Log back in and you should see a Networking & Security option on the main drop-down menu. Sometimes the vSphere Web Client can take while to load the first time while the plugin registers so you need to be patient.

Clicking on the Networking & Security menu launches you in to the main configuration page for NSX. From here we can click on Installation and Upgrades to finish the initial setup.

Now the NSX Manager is registered with vCenter we can complete the deployment by preparing the ESXi hosts. This will be covered in part 3.
To read our NSX solution brief, to book a meeting to discuss NSX with Ben or for more information on VMware NSX, click the button below:
To read other articles within this series, click below: